
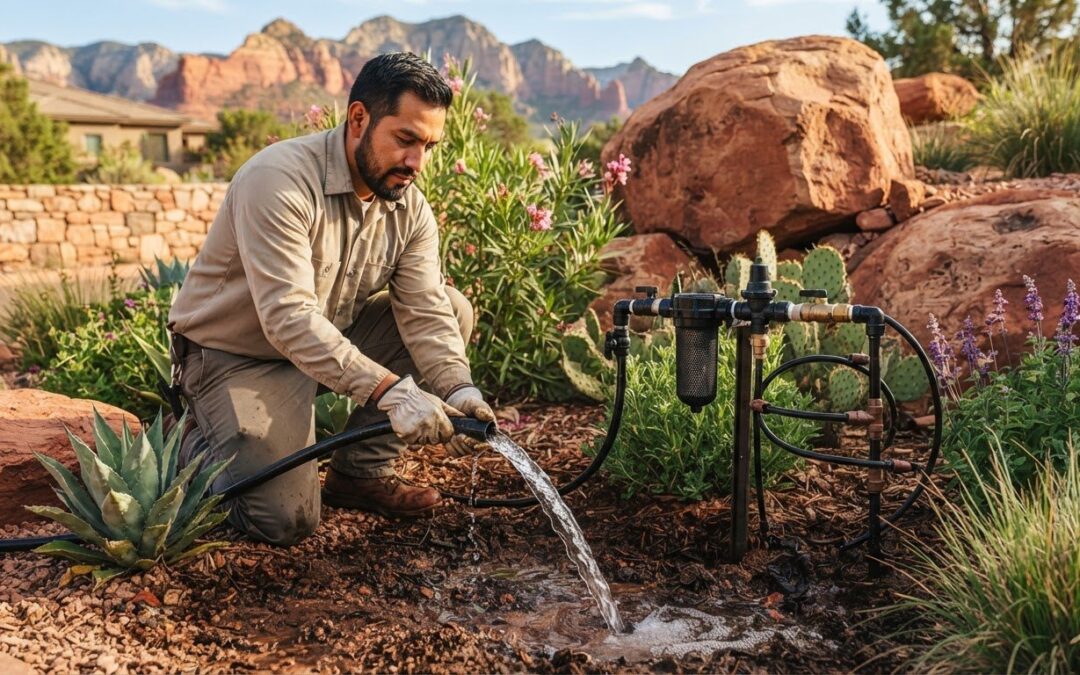
Clean water is the clearest sign that a drip line has been flushed. Flush each mainline, submain, and lateral for at least 2 minutes or until the water runs clean. After repairing a line, flush out sediment and debris, repressurize the system, run it again, and check for leaks. These drip system maintenance tips help you keep water moving where plants need it.
Clogged filters, uneven pressure, and small leaks can go unnoticed until plants show signs of uneven watering. A regular maintenance routine helps you catch these issues early and keep your irrigation system working as intended. This guide explains how to flush lines, clean filters, check operating pressure, and inspect tubing and emitters. You’ll also learn what to watch for after a repair and when a recurring problem may need professional drip system repair.
Key Takeaways
- Clean filters when the pressure difference across a primary filter exceeds 5 psi, and choose filtration suited to your water source.
- Keep operating pressure within the range your drip system is designed for; too much pressure can cause emitters to pop off tubing.
- Inspect drip lines weekly for cracks, leaks, and emitters that may be partly blocked.
- Use chlorine or acid treatments only with the right procedure for the clogging issue, and flush lines with clean water afterward.
- Track pressure and water flow so changes can alert you to blockages or system problems.
How to flush drip lines?
Flush each mainline, submain, and lateral for at least 2 minutes or until water runs clean. After repairs, flushing clears sediment and debris before you repressurize the system, run it again, and check for leaks. These drip system maintenance tips help keep water moving through the lines and reaching plants evenly.
- Flush the mainline, submains, and laterals in sequence. Start the irrigation system, then open the appropriate valves and flush one section at a time. Give each mainline, submain, and lateral at least 2 minutes, continuing longer if the water still carries visible debris. Flushing separately helps carry material out rather than shifting it into another part of the system.
- Check and flush the primary filter. Compare pressure before and after the filter while the system is operating. Flush a sand, screen, or disk filter when the pressure differential exceeds 5 psi. To clean a disk filter, remove the disks from their housing, rinse them with a hose, and replace them. This step helps keep sediment from reaching emitters and clogging lateral lines.
- Open lateral ends to release trapped debris. Remove end caps or stoppers so sediment can flow out instead of gathering near the last emitters. Run water through each lateral until it looks clear, then secure the ends again. Keep dirty discharge away from plants, and flush lines one at a time when several need attention. Clear water at the outlet shows that loose debris has been flushed out.
- Schedule a thorough flush after harvest. Flushing drip lines for an hour after harvest can help clear unwanted material. Keep outlets open and watch the discharge for debris. Routine flushing once or twice a season is recommended, but water quality and filter efficiency affect how often it is needed. These drip system maintenance tips can also help you spot a line that repeatedly releases sediment.
- Flush repaired tubing, then test it under operating pressure. Flush the repaired section before closing its end to remove debris that entered during the repair. Repressurize the system, run it again, and inspect the repair and nearby fittings for leaks. To winterize in cold climates, shut off the water and drain the system so water doesn’t remain in components that could freeze. In Arizona, winterize drip systems if temperatures may fall below 32°F.
Pressure regulation and operating pressure
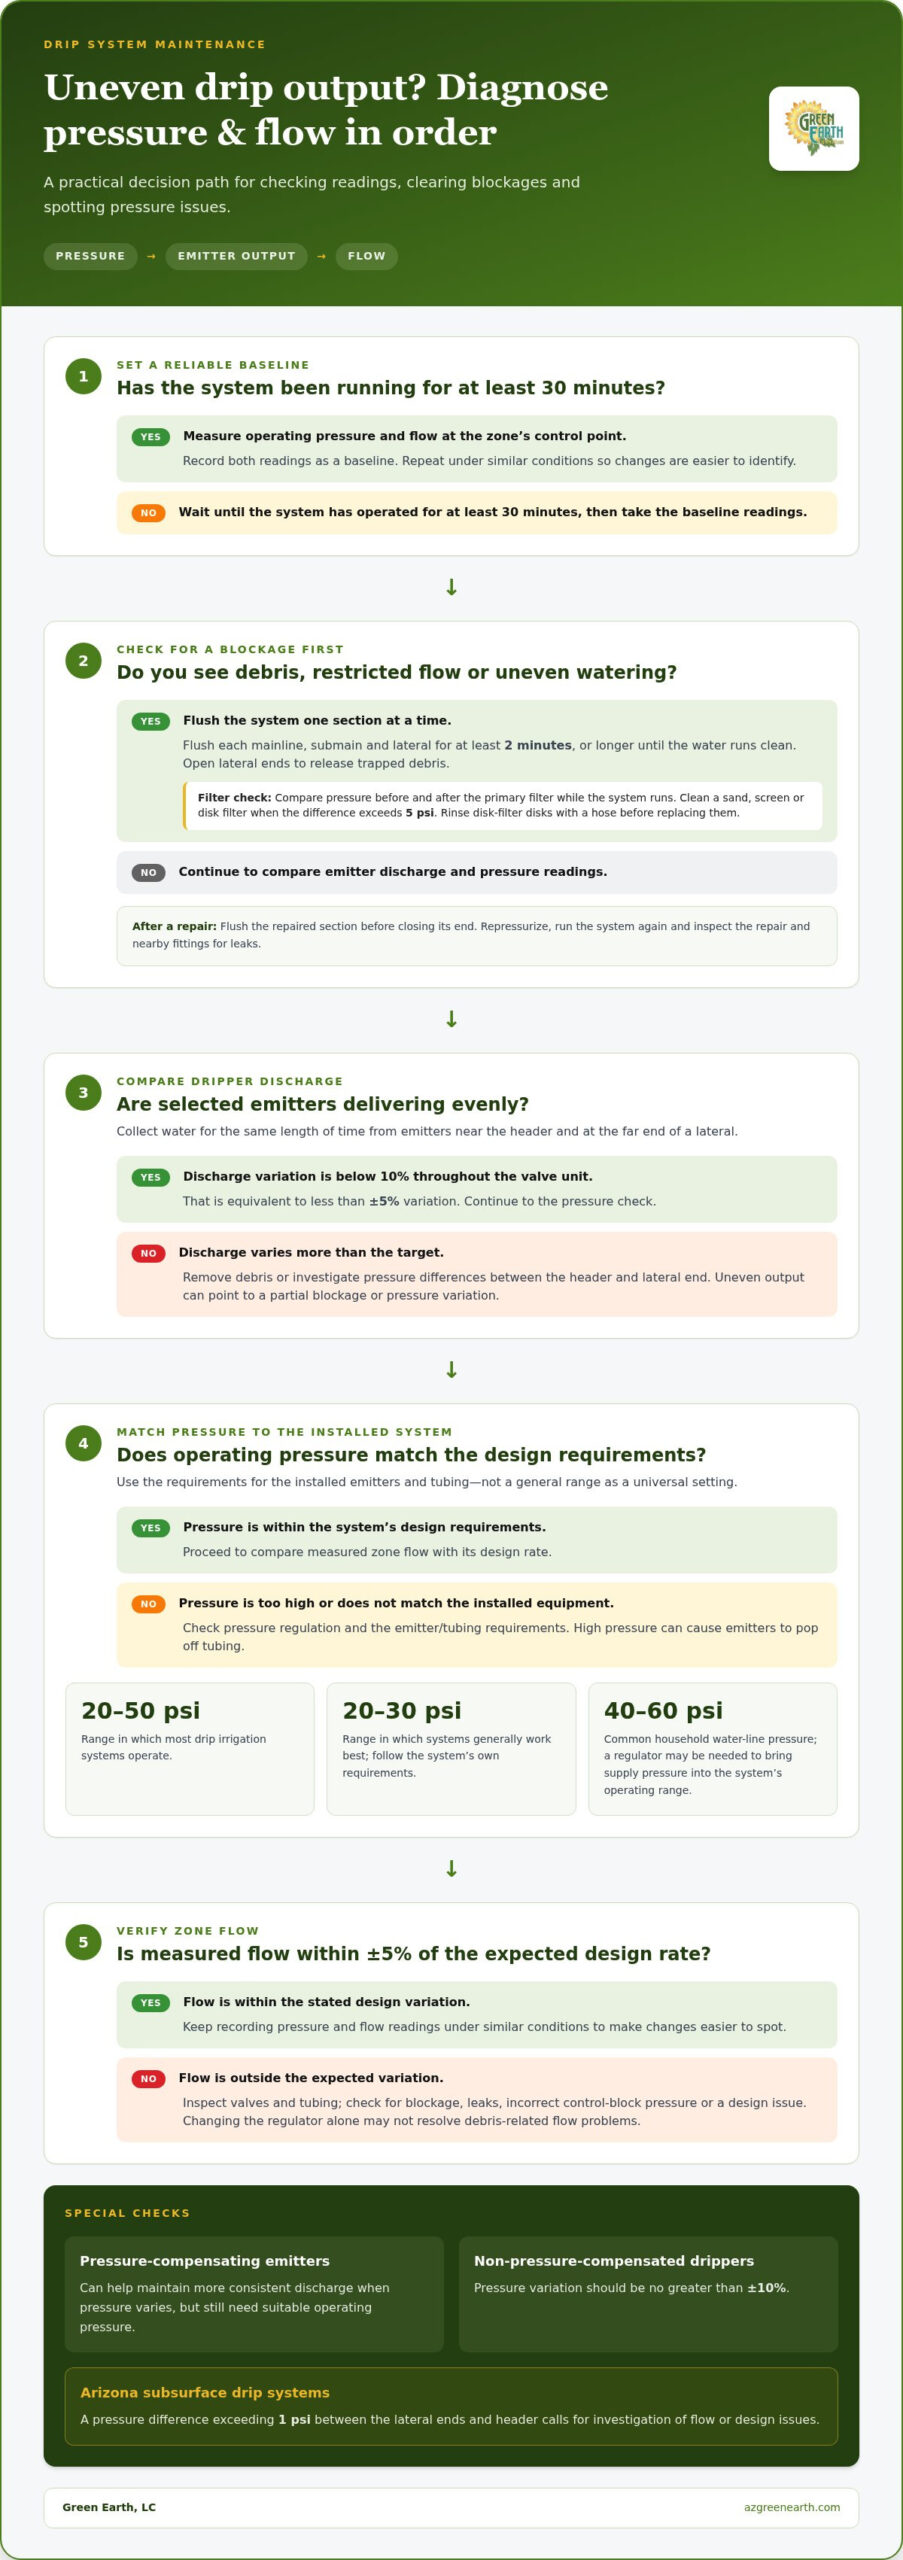
Check pressure and flow while the drip irrigation system is running, then compare the readings with its design. Before changing emitter settings to improve coverage, clear blockages and check pressure. Pressure-compensating emitters can help maintain more consistent discharge when pressure varies.
-
Monitor System Pressure and Flow
Measure operating pressure and flow rate at the zone’s control point, then record both readings as a baseline. Metzer recommends measuring actual flow and working pressure for each irrigation shift after the system has operated for at least 30 minutes. Repeat the inspection regularly under similar conditions, so changes are easier to identify. A sudden shift can indicate a leak, blockage, or pressure-regulation issue.
-
Test Dripper Pressure and Discharge
Collect water from selected emitters for the same length of time, then compare their discharge. Include emitters near the header and at the far end of a lateral; uneven output can point to pressure differences or partial blockage. A properly designed system should have less than 10% variation in dripper discharge throughout a valve unit, equivalent to less than ±5% variation. Remove debris or investigate pressure when readings vary.
- Set pressure to suit the system. Most drip irrigation systems operate at 20 to 50 psi, while systems generally work best at 20-30 PSI. Follow the pressure requirement for the installed emitters and tubing rather than treating either range as a universal setting. Household water lines commonly deliver 40-60 PSI, so a pressure regulator may be needed to bring supply pressure into the system’s operating range. High pressure can cause emitters to pop off tubing.
- Compare flow with expected output. Check the zone’s measured flow rate against its design rate after the system is running steadily. A properly designed system should have less than ±5% variation from expected flow. A reading outside that range can signal a blockage, leak, incorrect control-block pressure, or design issue. Inspect valves and tubing before adjusting pressure; changing the regulator alone may not resolve a flow problem caused by debris.
- Account for emitter type and system position. Pressure-compensating emitters help keep discharge more consistent as pressure changes along the line, but they still need suitable operating pressure. For non-pressure-compensated drippers, pressure variation should be no greater than ±10%. Compare output at different points on the lateral and check the pressure difference between its ends and header. A difference exceeding 1 PSI in an Arizona subsurface drip system calls for investigation of flow or design issues.
What Is Drip Irrigation Maintenance?
For an installed drip system, match any chemical treatment to the material causing the clog. Flush the lines with clean water afterward, and use soil and plant signs to guide watering.
-
Clean Lines with Chlorine or Acid
Identify whether organic material or mineral deposits are restricting flow before choosing a chemical treatment. Metzer describes 5-10 ppm as a common chlorine concentration for intermittent treatment, applied for 2-4 hours per cycle. During chlorine treatment, free chlorine should be detectable at 0.5-2 ppm at the farthest lateral’s end. These are distinct measurements, so follow the correct treatment procedure rather than treating them as interchangeable.
Use chemical products only as directed on their labels and in line with the system’s treatment requirements. Don’t combine treatments or guess at concentrations, since incorrect use can damage irrigation components. After treatment, flush the lines with water so the solution does not remain in the system.
-
Treat Mineral Deposits with Acid
Use acid for mineral deposits, not as a substitute for identifying the clog. For acid cleaning, irrigation water is usually brought to pH 2-4, depending on the blockage. An effective concentration should dissolve deposits from an affected emitter within 10-20 minutes. In Arizona subsurface systems, guidance describes lowering water to pH 2-3 for about 20-60 minutes, then flushing.
Always add acid to water, never water to acid, and follow the product label. Flush the system again with water alone after treatment. Keep acid separate from other chemicals, and don’t inject it without the proper equipment and procedure.
-
Conserve Water and Check Plant Signs
Follow local watering schedules, then adjust run time based on soil moisture rather than guesswork. Check the soil two to three inches below the surface; dry soil may mean plants need more water. Soggy soil, runoff, or yellowing leaves can indicate overwatering, while dry soil and wilting can point to insufficient delivery.
Check plant beds and emitters together: uneven flow can leave some roots dry while nearby soil stays wet. If soil is dry, the guidance recommends adding five minutes to the irrigation run time. Recheck soil moisture weekly, and keep any adjustments within local watering rules.
-
Prevent Algae, Buildup, and Root Intrusion
Prevent organic clogging by keeping filters clean and flushing lines when debris appears. For organic clogging in an Arizona drip system, guidance recommends about 0.5-1.0 gallon of 35% hydrogen peroxide per 1,000 gallons of irrigation water during the last hour of watering, once per growing season. Hydrogen peroxide treatment generally uses a concentration 3-5 times higher than chlorine treatment.
Hydrogen peroxide for irrigation is usually available at 35% or 50% concentration, so follow the treatment instructions carefully. Inspect tubing, emitters, and joints for damage or restricted flow; repair damaged sections and flush them. Regular inspection helps catch mineral deposits, organic material, and signs of root intrusion before they disrupt water delivery.
Visual and manual system inspections
Inspect the irrigation system while it runs, then walk it again with the water off. Weekly checks of tubing and emitters can reveal changes before they affect plant growth.
-
Inspect Pumps and System Components
Inspect the pump monthly, along with the irrigation components around it. Look for visible damage, loose connections, unusual moisture, or material collecting around the equipment. Compare your observations with the previous inspection; a new leak or change in pump sound deserves attention.
Trace the system from the water supply through the controls and tubing. Check valves, filter housings, connectors, and exposed lines for cracks, movement, or wear. Water quality affects sediment and deposits, so note any changes in visible residue. Keep a simple inspection record of the date, repairs, and unusual observations.
Schedule broader system maintenance at least once a year, with twice-yearly maintenance preferred. A spring inspection can identify issues before regular irrigation begins; a second inspection can catch wear during the growing season. Check rubber seals for deterioration, since they’re usually replaced every 3 to 5 years. Replace rubber gaskets and diaphragms every 2 years.
-
Inspect the System and Emitters
Inspect dripline laterals weekly while the system is running. Look for dry patches, unusually wet soil, pooling water, or emitters delivering little or no water. Partially clogged emitters can distribute nutrients unevenly, so compare nearby plants and soil as well as the emitter outlets.
Run your hand along accessible tubing to feel for cracks or leaks. Check connections and the ground around each lateral for unexpected dampness. If a section looks damaged, note its location and check nearby emitters for changes in flow. A small leak can disrupt water distribution even if the rest of the zone appears normal.
Inspect individual emitters for debris, damage, or inconsistent discharge. Compare a stressed plant with neighboring plants on the same line; local differences can help distinguish an emitter issue from a broader irrigation problem. Don’t assume every dry plant needs a longer watering cycle. First check its emitter, surrounding soil, and nearby tubing.
After a repair or component adjustment, run the system and repeat the visual inspection. Confirm that the affected area receives water and that the repair remains dry on the outside. Record recurring trouble spots, since repeated problems at the same lateral or fitting may need further investigation.
Filter selection and cleaning
Choose a filter suited to the water entering your drip irrigation system, and use pressure changes and visible debris to guide cleaning. Match any line cleaner to the buildup and follow its product instructions.
- Select filtration for the water source. Choose a filter suited to the water type, with enough filtration area to allow longer intervals between cleanings. Sediment and other contaminants can clog emitters, while mineral deposits may need a different response. Consider what enters the system and how quickly the filter collects debris instead of relying on the same cleaning schedule for every setup.
- Use pressure readings to decide when to clean. Flush primary sand, screen, or disk filters when the pressure differential exceeds 5 psi. Check the pressure on both sides of the filter while drip irrigation is operating. A difference of 5 psi across a sand or media filter usually indicates about 1 inch of contamination in the media. Clean sooner if visible buildup is restricting flow.
- Clean disk filters carefully. Remove the disks from their housing, rinse them with a hose, and replace them. Make sure the disks sit correctly before restarting the system. For media filters, check sand or granite depth twice per season, and replace the media at least every 2 years. Secondary filter cores generally need replacement every 5 or 6 years, depending on wear.
- Investigate repeated filter loading. If a secondary filter reaches a 5 psi pressure differential more than once per day, check both primary and secondary filter systems. Frequent loading can point to a mismatch between filtration and incoming water, or a problem upstream. Record pressure readings and cleaning frequency through the season; a pattern helps distinguish routine debris from a developing problem.
- Choose line cleaners by the type of clog. Hydrogen peroxide is used for organic clogging, while acid treatment targets mineral deposits. Don’t assume a cleaner is non-toxic or suitable for every component; follow its label and system instructions. Never mix chemicals, and flush lines with water after treatment. If filters keep clogging or emitters remain restricted, arrange professional drip system repair to address the irrigation problem.
Drip irrigation filters help prevent emitters from clogging due to sediment and other contaminants in water. For an Arizona subsurface drip irrigation system, investigate a pressure differential across filters greater than 12 PSI.
Green Earth, LC: HOA Landscape Maintenance
Green Earth, LC provides HOA Landscape Maintenance and Irrigation Drip System Repair for communities experiencing uneven watering, recurring leaks, or damaged drip lines. Turn to its irrigation repair service when flushing and filter cleaning have not resolved the problem, or when pressure changes and persistent leaks need attention. For associations, coordinated landscape maintenance can keep irrigation and the wider grounds in view as part of ongoing property care.
Whether you manage a shared landscape or commercial grounds, reliable irrigation supports healthy plants and responsible water use. Green Earth, LC also provides Commercial Landscape Maintenance and Firewise Defensible Space. Contact Green Earth, LC to discuss drip system repair or landscape maintenance for your property in Sedona, Camp Verde, Cottonwood, Flagstaff, or Prescott.
Keep Your Landscape Ready for What’s Next
A consistent irrigation routine helps you care for a landscape as it changes through the growing season. Record what you notice, including areas that dry unevenly, recurring leaks, and adjustments that affect plant health. Over time, these notes can reveal patterns and help you decide when routine upkeep is not enough. These drip system maintenance tips support thoughtful water use, but persistent equipment problems may need hands-on repair.
Green Earth, LC provides HOA Landscape Maintenance and Commercial Landscape Maintenance for shared and managed landscapes, as well as Firewise Defensible Space. These services support broader property care while irrigation concerns are addressed through appropriate maintenance work. Consistent attention to irrigation and surrounding grounds makes a landscape easier to manage.
For support with your property’s landscape needs, contact Green Earth, LC. Take the next step toward a healthier, well-cared-for outdoor space.
Frequently Asked Questions
What items to keep nearby?
Keep a tubing cutter, replacement emitters, matching fittings, end caps, and a small bucket nearby. A pressure gauge and notebook can help you record system readings and mark where repairs or blockages occur. Match barb fittings to the tubing’s inner diameter and compression fittings to its outer diameter. For properties in Sedona, Camp Verde, Cottonwood, Flagstaff, or Prescott, keep the system layout accessible so you can identify each zone.
How often should you inspect and maintain a drip irrigation system?
Inspect dripline laterals weekly and the pump monthly. Plan system maintenance at least once a year, with twice-yearly maintenance preferred. Check the system before the growing season, then revisit it as plants grow and irrigation demand changes. Inspect it after digging, landscaping work, or controller adjustments too, since disturbed tubing or changed schedules can affect water delivery.
How do you clean clogged drip emitters and filters?
First identify whether the obstruction is in the emitter or the filter. Turn off the system before opening a filter housing, then rinse removable disk components and reinstall them correctly. For an emitter, clear visible debris and flush the connected tubing with clean water. Compare its output with nearby emitters. If it remains restricted, replacement may work better than forcing debris deeper into the opening.
How do you flush drip irrigation lines?
Open the line ends and run water through each section until the discharge looks clean. Work from the mainline toward the submains and laterals, using valves to isolate sections so debris exits instead of shifting elsewhere. Keep dirty discharge away from plant roots and walk the line while it runs. If sediment continues to appear, inspect the filter and water source before returning the system to normal operation.
How do you find and repair leaks in drip tubing and fittings?
Run the system and look for wet spots, bubbling soil, or water escaping at a connection. Turn off the zone before cutting damaged tubing. Connect new tubing to an undamaged section with a fitting sized to the tubing. Barb fittings match the inner diameter; compression fittings match the outer diameter. Restart the zone and check the repair under operating pressure for continued seepage.
How often should drip irrigation filters be cleaned or replaced?
Clean filters when inspection shows buildup or when the pressure difference across a primary sand, screen, or disk filter exceeds 5 psi. Replacement timing depends on the filter component: media such as sand or granite should be replaced at least every 2 years, while secondary filter cores are generally replaced every 5 or 6 years, depending on wear. Check media depth twice per season and track pressure readings.
Recent Comments