
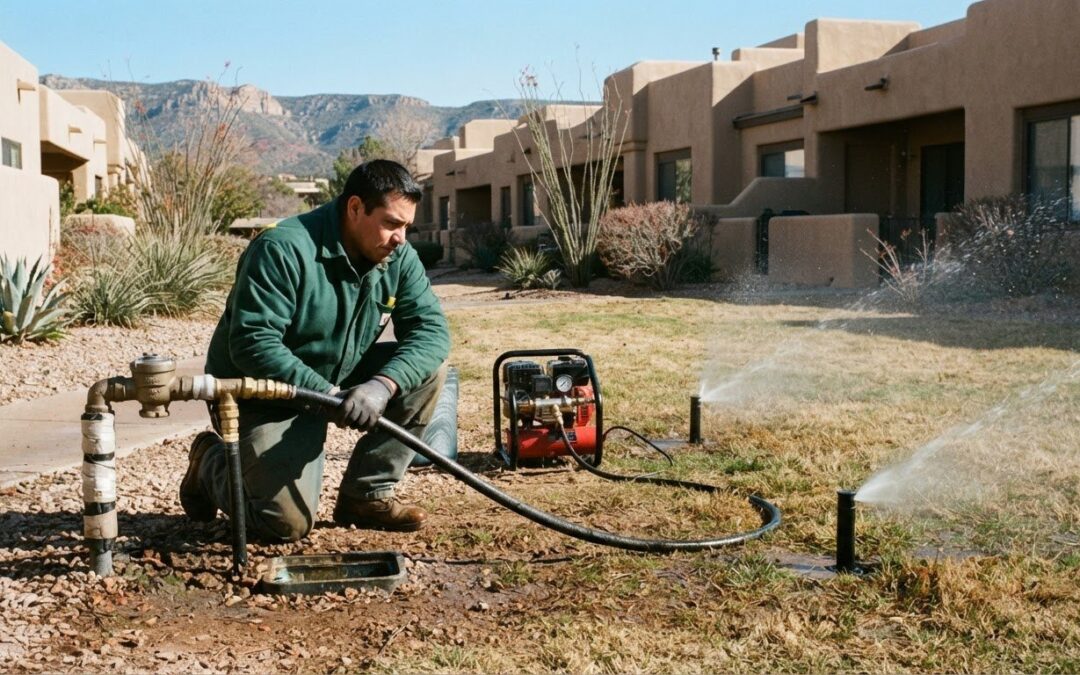
A mild Arizona winter doesn’t make irrigation lines frost-proof. In Northern Arizona, sprinkler systems are generally winterized from late September to early November, before a sustained freeze. Knowing how to winterize an irrigation system in Arizona means shutting off the water supply and removing water from vulnerable lines and components. Most buried systems are suited to a blowout, while manual drainage depends on the system’s valves and slope.
It’s understandable to wonder whether you can skip winterizing in a warm climate. Local conditions matter: elevation, exposure, soil, and system layout all affect freeze risk. Drip lines, valves, and backflow equipment need attention alongside sprinkler zones.
This guide explains when to prepare, how shutdown and compressed-air blowout work, and what to protect around backflow preventers and drip irrigation. You’ll also learn why the right method depends on the system and when an irrigation specialist can help prevent avoidable damage.
Key Takeaways
- Plan winterization before a sustained freeze, factoring in local elevation, exposure, and system layout.
- Choose a drainage method suited to your system, and use care during compressed-air blowouts to avoid equipment damage.
- Protect above-ground backflow components and pipes while keeping vents and drain outlets clear.
- Give drip irrigation its own winterization attention, since its lines and components also need protection from freezing water.
Do all Northern Arizona irrigation systems need a blowout?
No. The right winterization method depends on the system’s layout and components. Plan for freeze protection, then choose a suitable drainage method.
-
Check Local Winter Shutdown Rules
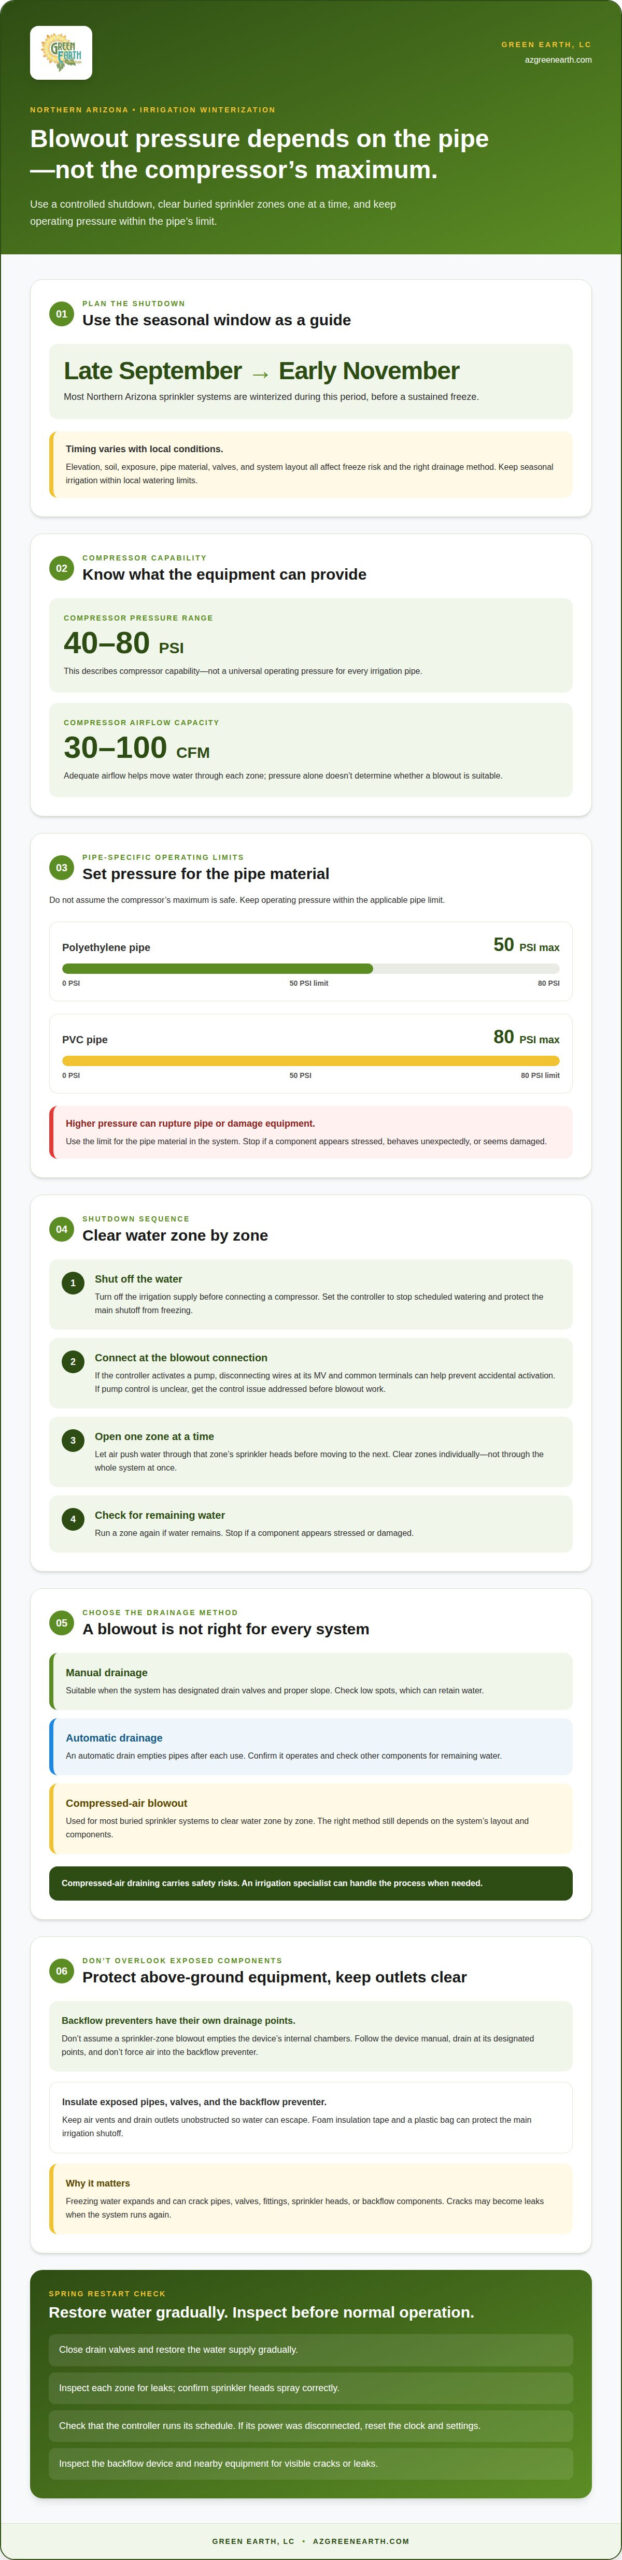
Check applicable local watering schedules, then plan winterization around freeze risk. In Arizona, preparation depends on the forecast and system conditions. Keep seasonal irrigation within local watering limits. Most Northern Arizona sprinkler systems are winterized from late September to early November. Use that window as a guide, while watching for a sustained freeze. Elevation, soil, exposure, pipe material, valves, and layout all affect the right method. Not every system needs a blowout. Manual drainage suits systems with drain valves and proper slope, though low spots can retain water.
-
Shut Off and Drain Sprinkler Systems
Shut off the irrigation water supply before draining each zone. For a manual system, open its designated drain valves and let water leave the pipes. Proper slope supports drainage, but check low spots where water may remain. An automatic drain empties pipes after each use; confirm it operates and check for water remaining in other components. A blowout suits most buried sprinkler systems because it clears water zone by zone. Excessive compressed-air pressure can damage pipes and fittings. Stop if components behave unexpectedly. Draining pipes carries safety risks, so an irrigation specialist can handle the process.
-
Protect Pipes, Valves, and Sprinkler Heads
Protect exposed heads, risers, valve manifolds, and shutoff areas, where trapped water can freeze. As water freezes, it expands and can crack pipes, valves, fittings, or sprinkler heads. Cracks may become leaks when the system runs again. Before spring startup, close drain valves and restore water gradually. Inspect each zone for leaks, then confirm that heads spray correctly and the controller runs its schedule. If controller power was disconnected, reset its clock and settings before normal operation. A careful spring inspection can reveal winter damage before it disrupts irrigation.
Irrigation system shutdown and compressed-air blowout
Use a controlled shutdown sequence, then clear water zone by zone. The pipe material determines the pressure limit.
-
Shut Down the Irrigation System
Shut off the irrigation water supply before connecting a compressor. Set the controller to stop scheduled watering, and protect the main shutoff from freezing. If the controller activates a pump, disconnecting wires at its MV and common terminals can help prevent accidental activation. If pump control is unclear, irrigation controller troubleshooting can address the control issue before blowout work begins.
-
Connect the Compressor and Clear Each Zone
Connect the compressor at the system’s blowout connection, then open one zone at a time. Let air push water through that zone’s sprinkler heads before moving to the next. Clear zones individually rather than sending air through the whole system at once. Run a zone again if water remains. Stop if a component appears stressed or damaged.
-
Meet Compressor Pressure and Airflow Requirements
Choose a compressor providing 40 to 80 PSI, with a capacity of 30 to 100 CFM. These figures describe compressor capability, not a universal pressure setting for every pipe. Check the system’s pipe material and keep operating pressure within its limit. Adequate airflow helps move water through each zone; pressure alone doesn’t determine whether a blowout is suitable.
-
Use Safe Compressed-Air Pressure
Limit pressure to 50 PSI for polyethylene pipe and 80 PSI for PVC pipe. Higher pressure can rupture either material, while excessive air pressure can damage irrigation equipment. Set pressure according to the pipe with the lower applicable limit, and never assume the compressor’s maximum is safe. Compressed-air draining carries safety risks, so a local irrigation specialist can perform the blowout when needed.
Keeping backflow preventer air vents and drain outlets clear
Backflow assemblies sit above ground, where they are exposed to the weather. Protect the device itself, but keep its air vents and drain outlets unobstructed.
- Inspect the backflow preventer and its drainage points before cold weather. Above-ground assemblies can hold water in internal chambers, leaving them vulnerable to freeze damage. Identify the air vents and drain outlets, then keep leaves, covers, and insulation clear of those openings. A blocked outlet can prevent proper drainage, even when the buried sprinkler lines have been cleared.
- After shutting off the irrigation supply, drain the backflow device at its designated drain points. Don’t assume compressed air moving through sprinkler zones also empties the assembly’s internal chambers. Follow the device’s manual for its drainage arrangement, and don’t force air into the backflow preventer. Check the assembly and nearby valves for retained water, since those above-ground parts are directly exposed.
- Insulate exposed irrigation pipes, valves, and the backflow preventer before freezing temperatures arrive. Fit insulation around the equipment without covering its air vents or drain outlets. Foam insulation tape and a plastic bag can protect the main irrigation shutoff. Keep the covering secure and arranged so water can still escape through the designated drainage openings.
- Include less obvious equipment in the seasonal inspection, not just sprinkler heads. Check the main shutoff area, valve connections, and backflow assembly after manual draining or a zone blowout. Look for water remaining in chambers or around outlets, and clear any obstruction. Before spring watering resumes, remove protective coverings as needed and inspect the device for visible cracks or leaks.
Drip irrigation winterization
Drip systems need attention alongside sprinkler zones. Knowing how to winterize an irrigation system in Arizona includes preparing tubing, emitters, fittings, and exposed valves, which may retain water that expands during a freeze.
- Trace each drip zone from its supply connection to the final emitter. Note exposed tubing, fittings, valves, and low points where water may collect. A lawn sprinkler blowout doesn’t automatically clear every drip line or component. Treat each zone separately, and choose a drainage method suited to its layout and materials. This distinction is central to how to winterize an irrigation system in Arizona when a property has both drip and sprinkler zones.
- Shut off the water supply before draining the drip system. Use manual drain valves if the design includes them, and allow water to leave the tubing. Automatic drains can help empty pipes after use, but don’t replace checks of other components. Inspect low areas and exposed connections for retained water before freezing temperatures arrive.
- Use compressed air only if the drip system and its components can tolerate it. Clear lines carefully, without assuming pressure suitable for another zone is appropriate here. Excessive air pressure can damage irrigation equipment. If tubing flexes, fittings strain, or emitters appear damaged during a blowout, stop rather than forcing water through.
- Protect exposed drip tubing, valves, and connections from freezing weather. Keep protective material from blocking drainage points or hiding leaks. Check where tubing emerges from the ground, since these transitions are exposed and easy to overlook. Include drip zones in the same seasonal review as sprinkler heads and backflow equipment.
- Inspect the system again before spring watering resumes. Restore the supply gradually, then observe each zone for leaks, loose fittings, or emitters that fail to deliver water. A cracked connector or damaged line can waste water once the system runs. For drip components that need attention, arrange drip system repair as part of restoring the zone.
Green Earth, LC: Irrigation Drip System Repair
Green Earth, LC provides Irrigation Drip System Repair when winter checks reveal cracked tubing, loose fittings, damaged emitters, or leaks. These issues can keep a drip zone from delivering water evenly when spring watering resumes. Repairing affected components helps restore the system’s function and supports landscape health.
Use this service when a drip line remains damaged after winterization, a connection leaks during startup, or emitters fail to distribute water as intended. Green Earth, LC addresses drip system problems as part of maintaining dependable irrigation. For help with drip irrigation repairs, contact Green Earth, LC to discuss your system.
Prepare your landscape for the next season
Winter care is also a chance to consider how irrigation supports the landscape you want to maintain through changing seasons. Knowing how to winterize an irrigation system in Arizona helps protect that investment, while a spring inspection can guide watering adjustments and repairs.
Green Earth, LC offers HOA Landscape Maintenance, Commercial Landscape Maintenance, and Firewise Defensible Space alongside irrigation drip system repair. These services support properties with different landscape needs, from shared community grounds to commercial sites and defensible spaces. For drip line damage or other irrigation concerns, choose a next step that fits the issue and the property.
Contact Green Earth, LC for help with irrigation drip system repairs or landscape care. A well-maintained system can support a thoughtful approach to caring for your Arizona landscape in every season.
Frequently Asked Questions
Can I just not winterize if I live in a warm climate?
No. A warm climate doesn’t eliminate frost risk in Northern Arizona. Plan before a sustained freeze, especially where elevation or exposure leaves irrigation components vulnerable. Winterizing the system doesn’t mean landscape plants never need water. During dry winter periods, some plants may need occasional supplemental watering before the ground freezes. Water in the morning so plants can absorb it before evening temperatures fall.
How long will a blowout take?
A professional blowout for a typical residential sprinkler system takes around 30 minutes. A DIY blowout takes an hour or more. The work involves clearing zones individually, so the system’s layout and the number of zones affect the time needed. Backflow equipment and drip lines also require separate attention, rather than assuming a sprinkler-zone blowout clears every irrigation component.
How will I know it’s blown out?
Confirm that every sprinkler zone has been cleared rather than relying on one zone as a sample. If water remains, run that zone again; a second pass may be needed. Check separate components too, including drain points and the backflow assembly. A clear sprinkler zone doesn’t mean water has been removed from every part of the irrigation system.
Should You DIY or Hire a Pro?
Hire an irrigation specialist if you’re unfamiliar with the system or compressed-air equipment. A DIY blowout requires matching pressure to pipe material and clearing zones individually. Excess pressure can rupture pipes or damage equipment, and draining lines carries safety risks. Professional help is a practical choice when the layout is complex, pipe material is uncertain, or the controller operates a pump.
What Is Sprinkler Winterization & Why Do It?
Sprinkler winterization prepares an irrigation system for freezing weather by shutting off its water supply and removing water from vulnerable components. Water left in pipes, valves, or sprinkler heads can expand as it freezes and cause cracks or leaks. Clearing the system before winter helps reduce that damage and gives you a chance to identify repairs before spring startup.
When should you winterize irrigation in Prescott?
In Prescott and other Northern Arizona locations, plan winterization from late September to early November, before a sustained freeze. Use the forecast alongside the property’s elevation and exposure, since local conditions influence timing. Don’t rely on a mild afternoon alone; prepare before freezing weather arrives. The system’s layout and components also determine the appropriate drainage method.
Recent Comments